Disclosure: This post contains affiliate links and I will be compensated if you make a purchase after clicking through my links. Learn More
Welding a butt joint for full penetration is a skill that separates beginners from true professionals. Full penetration means the weld passes completely through the joint, making it as strong as the base metal. This is critical in bridges, pressure vessels, pipelines, and other applications where failure can be dangerous. But many welders struggle to prepare the joint correctly, leading to weak welds, defects, or even catastrophic failures. Proper preparation is just as important as technique. This guide explains, in clear language, how to prepare a butt joint for full penetration welding. You will find practical steps, important details, and expert advice that will help both new and experienced welders get reliable results.
Why Butt Joint Preparation Matters
A butt joint connects two pieces of metal in the same plane. If you want a weld that is as strong as the metal itself, you need full penetration. This requires the right joint design, precise edge preparation, and careful cleaning. If you skip or rush these steps, your weld will lack strength, contain hidden flaws, or fail inspection. The time spent on preparation saves much more time and cost in repairs or rework.
Full penetration butt welds face strict requirements in industries like shipbuilding, construction, and oil and gas. Codes such as AWS D1.1 and ASME Section IX set the standards. They require the joint to be free of gaps, irregularities, and contaminants. Meeting these standards starts with solid preparation.
Types Of Butt Joints For Full Penetration
Not all butt joints are the same. Choosing the right joint design is the first step. The main types are:
1. Square Butt Joint
Both edges are flat. Used for thin materials (less than 3 mm). Not suitable for thick plates because the weld cannot penetrate fully without a groove.
2. Single V-groove Butt Joint
Both edges are beveled, usually at 30-37. 5°. The groove forms a “V” shape. Most common for plates 6 mm and thicker.
3. Double V-groove Butt Joint
Both sides of the joint have a V groove. Used for thick plates (over 20 mm) to reduce weld volume and distortion.
4. Single Bevel Butt Joint
One side is flat; the other is beveled. Used when you cannot access both sides.
5. Double Bevel Butt Joint
Both sides have a bevel, but not a full V. Used for some thick materials, often with limited access.
6. U-groove And J-groove Butt Joints
These have curved grooves. They reduce weld volume but are harder to prepare and require special equipment.
Choosing the right joint design depends on material thickness, welding process, and code requirements. For example, a 12 mm plate often uses a single V-groove with a root gap, while a 40 mm plate may need a double V-groove.
Key Steps To Prepare A Butt Joint
1. Measure And Mark The Plates
Start with precise measurement. Use a steel ruler or tape and a scribe to mark where to cut or bevel. Accurate marking ensures a straight, square joint with the right groove angle.
- Measure twice, cut once.
- Mark both sides if doing a double groove.
- Check that the edges align perfectly.
2. Cut The Plates
Cutting methods include:
- Oxy-fuel cutting (for thick carbon steel)
- Plasma cutting (for mild steel, stainless, and aluminum)
- Mechanical cutting (grinding, saw, shears)
The cut must be clean and straight. Rough, wavy, or irregular cuts make fit-up difficult and create stress points.
Tip: Allow for slight extra material; you can always grind more, but you cannot add metal back.
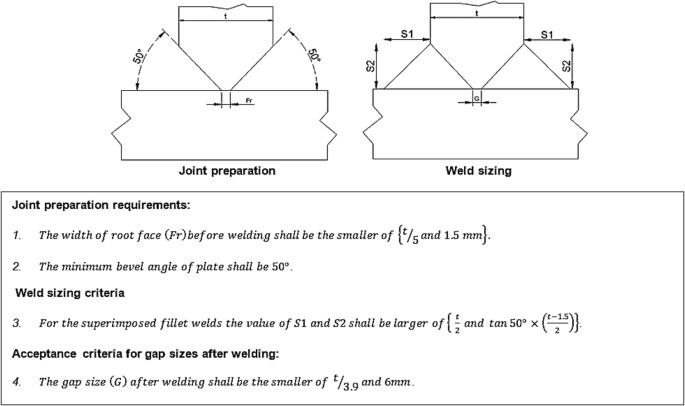
3. Prepare The Groove
Beveling creates the groove shape needed for full penetration. The most common groove is a V at 30° to 37.5°. Use an angle grinder, beveling machine, or cutting torch. For U- or J-grooves, a milling machine or special torch is needed.
- Check groove angle with a bevel gauge.
- Groove face must be smooth, with no undercuts or notches.
- Groove root (bottom) should have a small flat (land), usually 1-2 mm, unless a complete open root is needed.
Common error: Too large a land makes root fusion hard. Too small or missing land increases risk of burn-through.
4. Clean The Edges
Cleanliness is critical. Dirt, rust, oil, paint, and scale cause porosity, slag inclusions, and weak welds.
- Use a wire brush, grinder, or chemical cleaner.
- Remove all mill scale at least 20 mm from the groove.
- Wipe with acetone for stainless steel or aluminum.
- For painted or coated steel, use a grinder or sander to expose clean metal.
Non-obvious insight: Even new steel plates often have an oily film from the mill. Always clean, even if the plate looks clean.
5. Check Fit-up And Alignment
Fit-up means how well the two pieces come together. Poor fit-up leads to gaps, misalignment, and hard-to-control welds.
- Use strongbacks or clamps to hold plates in place.
- Check the root gap (space at the bottom) with feeler gauges. The typical gap is 1-3 mm depending on process.
- Check alignment with a straight edge or level.
Tip: For long welds, tack weld every 150-200 mm to hold alignment.
Common mistake: Not enough tacks or loose clamps can lead to distortion during welding.
6. Set The Root Gap And Land
The root gap lets the weld penetrate fully. The land supports the molten weld pool.
- For SMAW (stick), root gap: 1.5-2.5 mm; land: 1-2 mm.
- For GTAW (TIG), root gap: 1-2 mm; land: 0-1 mm.
- For GMAW (MIG), root gap: 1-2 mm; land: 0-1 mm.
Adjust to match the welding process and electrode diameter.
| Welding Process | Typical Root Gap | Typical Land |
|---|---|---|
| SMAW (Stick) | 1.5–2.5 mm | 1–2 mm |
| GTAW (TIG) | 1–2 mm | 0–1 mm |
| GMAW (MIG) | 1–2 mm | 0–1 mm |
Non-obvious insight: The right root gap varies with electrode size and position (flat, horizontal, vertical, or overhead). Test on scrap metal before starting production.
7. Tack Weld The Joint
Tack welds hold the joint together until you finish welding. If tacks are too small, they break. If too big, they can cause cracking.
- Tack length: 10-20 mm for most plates.
- Space tacks every 150-200 mm.
- Stagger tacks on both sides for thick plates.
Grind tacks smooth if they will be included in the final weld. Remove tacks if they have defects.
8. Inspect The Joint
Careful inspection before welding saves time and repairs later.
- Check for tight fit, correct root gap, and alignment.
- Look for cracks, undercut, or gaps in tacks.
- Make sure the joint is clean and dry.
For critical work, use dye penetrant or magnetic particle testing to find surface cracks.
9. Preheat If Required
Some metals need preheating to prevent cracking, especially thick or high-carbon steels.
- Check the material’s welding procedure for required preheat temperature.
- Use an infrared thermometer or temperature crayon.
- Heat evenly across the joint area.
Example: Many codes require 150°C preheat for carbon steel over 25 mm thick.
10. Protect The Joint Before Welding
Do not leave a prepared joint exposed for long periods. Moisture, dust, and oil can settle on the surface.
- Cover the joint with a clean cloth or plastic.
- Weld soon after preparation.
Common Problems In Butt Joint Preparation
Even experienced welders make mistakes during joint preparation. Here are some common errors and how to avoid them:
1. Irregular Groove Angle
If the groove angle is too narrow, the weld cannot reach the root. Too wide, and you waste filler metal and risk distortion.
2. Contaminated Surface
Oil, rust, or paint leads to porosity and weak welds. Clean all surfaces thoroughly.
3. Incorrect Root Gap
Too small a gap prevents penetration. Too wide causes burn-through or excess weld metal.
4. Misalignment
Plates not lined up lead to uneven welds and stress points.
5. Insufficient Tack Welds
Plates move during welding, causing defects.
6. Skipping Preheat
For some steels, skipping preheat causes cracks.
7. Improper Storage Before Welding
Leaving a prepared joint exposed allows rust and moisture, especially in humid shops.
Practical example: A shipyard welder once skipped cleaning new plates, thinking they were “factory fresh.” The welds failed X-ray inspection due to porosity from oil residue. Always clean, even new steel.
Credit: www.twi-global.com
Selecting The Right Tools For Preparation
The right tools make preparation faster, safer, and more accurate.
- Angle grinder: For beveling, cleaning, and smoothing edges.
- Beveling machine: For precise, repeatable grooves on thick plate.
- Cutting torch or plasma cutter: For initial cuts and rough bevels.
- Wire brush: For removing rust and scale.
- Clamps and strongbacks: For holding plates during fit-up.
- Feeler gauges: For checking root gap.
- Bevel gauge: For checking groove angle.
- Welding helmet and gloves: For safety during tack welding.
| Tool | Main Use | Best For |
|---|---|---|
| Angle Grinder | Beveling, cleaning | All thicknesses |
| Beveling Machine | Precise grooves | Thick plates |
| Wire Brush | Surface cleaning | All materials |
| Cutting Torch | Initial cut, rough bevel | Carbon steel over 6 mm |
How Base Metal Affects Joint Preparation
The type of base metal changes the way you prepare the joint. Here are some differences:
Carbon Steel
- Most common.
- Easy to cut and bevel.
- Needs cleaning to remove mill scale and oil.
Stainless Steel
- Forms a chromium oxide layer.
- Needs grinding and cleaning with acetone.
- Avoid carbon steel brushes (causes contamination).
Aluminum
- Forms oxide that melts at a higher temperature than aluminum itself.
- Remove oxide layer with stainless steel brush.
- Use a wider root gap to allow for expansion.
High-strength Low-alloy Steels
- May need preheat to prevent cracking.
- Beveling can be harder due to toughness.
Tip: Always check the material certificate or code for special preparation steps.
Joint Preparation For Different Welding Processes
Different welding processes have different requirements for joint preparation.
Smaw (stick Welding)
- Needs a root gap of 1.5-2.5 mm.
- Land of 1-2 mm.
- Clean groove faces to avoid slag inclusions.
- Use a V-groove for most plates.
Gmaw (mig Welding)
- Root gap: 1-2 mm.
- Land: 0-1 mm.
- Clean, oil-free surfaces are critical.
- Use a V-groove or U-groove for thick plates.
Gtaw (tig Welding)
- Needs the cleanest surfaces of all.
- Root gap: 1-2 mm.
- Land: 0-1 mm.
- Remove all oxides, especially for aluminum or stainless steel.
Saw (submerged Arc Welding)
- Used for very thick plates.
- U-groove or double V-groove common.
- Mechanized beveling for consistency.
Practical insight: Each process has limits for root gap and land. Always follow the procedure for your process.
Pre-weld Inspection And Quality Checks
Quality inspection is not just for after welding. Check before welding to prevent problems.
- Check groove angle and root gap at several points.
- Ensure surfaces are clean, dry, and free of cracks.
- Confirm tacks are solid and defect-free.
- For code work, record measurements for the inspector.
Tip: Take a photo of the prepared joint for records, especially for critical or certified work.
Joint Preparation For Special Cases
Limited Access
If you cannot reach both sides, use a single bevel or single V-groove. Prepare the accessible side as well as possible. Use a backing bar to help achieve full penetration.
Repair Work
For repairs, gouge out the old weld and clean the area. Prepare the groove as for new material. Remove all cracks and defects before welding.
Dissimilar Metals
If joining different metals (e. g. , stainless to carbon steel), match the preparation to the harder or more sensitive metal. Clean thoroughly to avoid contamination.
How To Minimize Distortion
Welding always causes some movement in the metal as it heats and cools. Good preparation helps control this.
- Use double V- or double bevel joints for thick plates to balance shrinkage.
- Use enough tacks to hold alignment.
- Weld in small sections, alternating sides if possible.
- Clamp the plates securely.
Non-obvious insight: Over-welding (making the weld bigger than needed) increases distortion and stress. Prepare the joint to minimize weld volume.
Safety Steps During Joint Preparation
Preparation can be dangerous if done carelessly.
- Wear eye protection when cutting, grinding, or beveling.
- Use hearing protection around grinders.
- Wear gloves to protect hands from sharp edges.
- Check for fire risks (sparks, hot metal).
- Ventilate the area when using solvents for cleaning.
Example: Grinding generates fine dust—use a mask and vacuum to avoid breathing metal particles.
Importance Of Backing Bars And Back Gouging
Backing bars are metal strips placed behind the joint to support the weld pool and ensure full penetration. Common for single-sided welds.
- Use a backing bar of compatible material.
- Remove the bar after welding if required by code.
Back gouging removes weld metal from the opposite side to ensure complete fusion.
- Used for double-sided welds.
- Gouge out to clean metal, then weld from the back side.
Credit: link.springer.com
Codes And Standards For Butt Joint Preparation
Most industries follow specific codes. The most common are:
- AWS D1.1 (Structural Welding Code – Steel)
- ASME Section IX (Boiler and Pressure Vessel)
- ISO 9692-1 (International)
These codes specify groove angles, root gaps, and cleaning standards.
Practical insight: Always get the current code edition for your project. Inspectors will require documentation.
For more details, see the official AWS D1.1 code.
Example Workflow: Preparing A 20 Mm Plate For Smaw
- Mark the cut line on both plates.
- Cut plates to size with a torch.
- Bevel both edges to 30° using a grinder.
- Leave a 1.5 mm land at the root.
- Clean the groove and 20 mm on both sides with a grinder and wire brush.
- Align plates with a 2 mm root gap using clamps.
- Tack weld every 150 mm.
- Check for alignment, gap, and cleanliness.
- Preheat to 120°C if required.
- Cover the joint until ready to weld.
How To Practice Good Joint Preparation
Like welding itself, joint preparation takes practice. Here are steps to improve:
- Make test joints and cut them open after welding to check penetration.
- Use a checklist before welding: Angle, gap, land, cleanliness, alignment.
- Ask for feedback from inspectors or experienced welders.
- Try different methods (grinding, machining, torch) to see what gives the best results.
Non-obvious insight: Many welders improve their welds simply by spending 10 more minutes on preparation.
Frequently Asked Questions
What Is The Ideal Groove Angle For A Butt Joint?
The ideal groove angle for a V-groove butt joint is typically 60° total (30° each side). This gives enough room for the weld to penetrate fully while keeping weld size reasonable. Codes may allow angles from 60° to 75° for thicker plates or different processes.
Why Is Cleaning The Joint So Important Before Welding?
Cleaning removes oil, rust, paint, and mill scale that can cause porosity, inclusions, or weak welds. Even a small amount of contamination can lead to weld failure, especially in critical structures. Always clean at least 20 mm from the groove.
Can I Weld A Full Penetration Joint Without A Root Gap?
A root gap is essential for most full penetration welds. Without it, the weld cannot reach the root and will lack strength. For thin sheet, a closed joint may work, but for anything over 3 mm, a 1-3 mm root gap is needed.
How Do I Know If My Joint Preparation Is Good Enough?
Your joint preparation is good if:
- The groove angle and root gap match the procedure.
- The surfaces are clean and smooth.
- The plates align perfectly.
- Tacks are solid and crack-free.
- The inspector approves the fit-up.
Test welds and X-ray inspections can confirm penetration.
What Happens If I Skip Preheating?
Skipping preheat on thick or high-carbon steel can cause cracking, especially in the heat-affected zone. Preheat slows cooling and reduces stress. Always follow the procedure or code for preheat requirements.
—
Preparing a butt joint for full penetration welding is a skill that pays off in safety, quality, and reputation. Careful measurement, cutting, beveling, cleaning, and fit-up give you a strong foundation. Take time on each step, check your work, and follow the codes.
A well-prepared joint makes welding easier, faster, and more reliable. With practice, you will see fewer defects, better X-ray results, and more confidence in your welds.
Credit: www.twi-global.com

