Disclosure: This post contains affiliate links and I will be compensated if you make a purchase after clicking through my links. Learn More
Welding a tee joint is a skill many welders need for projects both big and small. But even experienced welders often see a common flaw: undercut. Undercut is a groove at the weld toe that weakens the joint and reduces its appearance. If you want your tee joints to be strong and safe, learning how to avoid undercut is essential.
This guide explains everything you need to know to weld a tee joint without undercut. You’ll learn what causes undercut, how to set up your equipment, and which techniques help you avoid this flaw. The article shares practical tips, clear steps, and real examples.
Even if you’re new to welding, you’ll understand each part. By the end, you’ll be ready to weld tee joints with confidence and quality.
What Is A Tee Joint?
A tee joint is where two metal pieces meet at a 90-degree angle, forming the shape of a “T”. One piece stands upright on the flat surface of the other. This type of joint is common in construction, frames, and machinery.
Tee joints are popular because they are strong and easy to assemble. But the joint needs a solid weld to support weight and stress. If the weld has flaws, like undercut, the joint can fail early.
Understanding Undercut In Welding
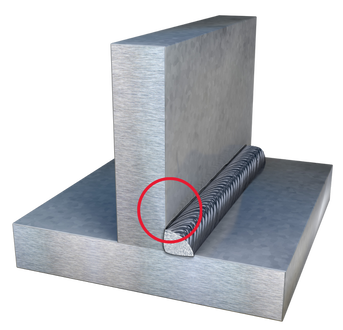
Undercut is a defect where the weld metal erodes the base metal along the edge, creating a groove or notch. It usually happens at the edge (toe) of the weld bead. This groove weakens the joint, making it more likely to crack or break.
Some key facts about undercut:
- It reduces the thickness of the base metal at the weld.
- It can be hard to see without close inspection.
- It lowers the strength of the welded joint.
- It fails welding quality tests.
Causes Of Undercut
Knowing why undercut happens is the first step to avoiding it. The most common causes include:
- Too high welding current: Excess heat melts the base metal too much.
- Fast travel speed: Moving the torch too quickly doesn’t allow enough filler metal.
- Incorrect torch angle: The wrong position directs heat away from the joint.
- Poor technique: Waving or dragging the torch can gouge the edge.
- Improper electrode size: A large electrode makes the weld pool too big.
- Low skill: Inexperience leads to uneven welds or poor control.
Preparing For A Clean Tee Joint Weld
Before you start welding, set yourself up for success. Good preparation prevents most mistakes, including undercut.
Clean The Metal
Dirt, rust, oil, and paint all cause welding defects. Use a wire brush or grinder to clean both pieces where they will join. Clean at least 25 mm (1 inch) on all sides of the joint.
Fit-up And Clamping
Tee joints need tight fit-up. Gaps cause the arc to jump, leading to undercut or weak welds. Use clamps or magnets to hold the pieces in position. The upright piece should sit flat on the base, with no space between them.
Choose The Right Electrode Or Filler Wire
Select the correct electrode or wire size for your material and welding process. For example, for mild steel with stick welding (SMAW), E6013 or E7018 electrodes are common. For MIG welding, use ER70S-6 wire.
Check the manufacturer’s guide for recommended size and settings.
Set Proper Welding Parameters
Your machine settings must match your electrode, wire, and material thickness. Too much heat causes undercut. Too little heat leads to poor fusion.
Here’s a reference for common parameters:
| Process | Material Thickness | Electrode/Wire | Amperage Range | Voltage (if MIG) |
|---|---|---|---|---|
| SMAW (Stick) | 3 mm | E6013, 2.5 mm | 80-100 A | – |
| MIG (GMAW) | 3 mm | ER70S-6, 0.9 mm | 90-120 A | 18-20 V |
| TIG (GTAW) | 3 mm | ER70S-2, 1.6 mm | 70-100 A | – |
Always check your machine’s manual and do a test weld on scrap metal first.
Welding Techniques To Prevent Undercut
Your welding technique has a big effect on the final joint. Small changes can make a big difference in quality.
Control Travel Speed
If you move the torch or electrode too quickly, the arc melts the base metal but leaves little filler behind. This creates a groove at the edge—undercut. On the other hand, moving too slowly can cause the weld to pile up and look rough.
- Aim for a steady, moderate speed.
- Watch the weld pool. It should stay round and consistent.
- Pause slightly at each end to fill the toe area.
Adjust Electrode Angle
The electrode angle changes how the heat spreads. The best angle for a tee joint is usually 45 degrees between the two plates, with a 5–15 degree tilt toward the direction of travel.
- Too steep an angle focuses heat on one piece, causing undercut on the other.
- Too flat an angle spreads the heat too much, making the weld weak.
Practice holding the correct angle and keep it steady throughout the weld.
Maintain Correct Arc Length
Arc length is the distance between the electrode tip and the base metal. If the arc is too long, the arc becomes unstable and causes more heat. This can melt the edge and create undercut.
- For stick welding: Keep the arc length equal to the electrode diameter.
- For MIG/TIG: Keep the tip 2–3 mm from the joint.
Use Weaving When Needed
For thicker joints, a slight weave motion helps fill the joint and avoid undercut. Move the electrode side to side in a smooth, controlled way. Do not swing too wide—just enough to cover the joint.
- For thin metal, a straight bead (no weave) is best.
- For thick metal, a weave pattern helps distribute filler.
Manage Heat Input
High heat input is the leading cause of undercut. Reduce amperage if you see undercut forming. If the joint is thick, use multiple passes instead of a single, hot pass.
- Weld in short sections, allowing the area to cool.
- Use a lower amperage for thin materials.
Fill The Toe Properly
The toe is where the weld bead meets the base metal. Pay attention to this area as you weld. Pause briefly at the edge to allow filler metal to build up and prevent grooves.
Credit: weldguru.com
Welding Process Considerations
Each welding process (stick, MIG, TIG) has different risks for undercut. Understanding these helps you choose the right method and settings.
Stick Welding (smaw)
Stick welding is common for tee joints but can cause undercut if not careful.
- Use the correct polarity (usually DCEN for E6013).
- Avoid whipping or jerking the electrode.
- Watch for slag. If slag covers the joint, it hides undercut.
Mig Welding (gmaw)
MIG welding gives a clean weld but heat control is key.
- Use the correct voltage and wire speed.
- Keep the gun angle at 45 degrees.
- Avoid pushing too fast, which leads to undercut.
- If using CO2 gas, watch for too much spatter.
Tig Welding (gtaw)
TIG welding gives the most control and lowest chance of undercut, but it is slower.
- Add filler wire at the toe, not just the center.
- Use a small torch angle.
- Keep a tight arc for precise heat.
Here’s a quick comparison of undercut risks by process:
| Process | Ease of Control | Risk of Undercut | Best Use Case |
|---|---|---|---|
| Stick (SMAW) | Medium | High | Outdoor, thick plates |
| MIG (GMAW) | Easy | Medium | General fabrication |
| TIG (GTAW) | High | Low | Thin metal, precision |
Step-by-step Guide: Welding A Tee Joint Without Undercut
Follow these steps to weld a tee joint and avoid undercut at every stage.
1. Prepare And Clean Materials
- Use a wire brush or grinder to remove rust, oil, and paint.
- Check for sharp edges; smooth them with a file.
2. Fit And Clamp The Joint
- Place the upright piece at 90 degrees on the base.
- Use strong clamps or welding magnets.
- Check alignment with a square.
3. Set Up The Welder
- Select the right electrode or wire size.
- Adjust amperage and voltage as shown earlier.
- Set correct polarity if needed.
- Test on scrap metal.
4. Tack Weld The Joint
- Place small welds at both ends and the middle.
- Tack welds hold the joint steady and prevent movement.
5. Weld The First Pass
- Hold the torch or electrode at 45 degrees.
- Keep arc length short and steady.
- Move at a moderate speed.
- Slightly pause at each toe to fill the edge.
- Watch the weld pool to avoid overheating.
6. Inspect For Undercut
- Let the weld cool for a few seconds.
- Use a chipping hammer or wire brush to clean off slag (for stick welding).
- Look closely at the edges for grooves or notches.
- If you see undercut, adjust your settings or angle before the next pass.
7. Add More Passes If Needed
- For thick joints, use multiple passes.
- Start with a root pass, then add fill passes.
- Each pass should cover the previous toe area.
8. Clean And Finish
- Remove all slag and spatter.
- Use a grinder to smooth rough spots if needed.
- Check the entire joint for undercut or other defects.

Credit: www.reddit.com
Practical Tips For Avoiding Undercut
Here are some expert tips many beginners miss:
- Preheat thick metal: For steel over 10 mm, preheat to 100–150°C. This reduces thermal shock and undercut risk.
- Use the right shielding gas: For MIG, use a mix of CO2 and argon for smoother welds.
- Short-circuit transfer: In MIG, use short-circuit mode for better control on thin metal.
- Check your hand position: Rest your hand or elbow to steady the torch.
- Don’t overweld: Adding too much filler overheats the joint, leading to undercut or burn-through.
Common Mistakes That Cause Undercut
Some errors show up again and again, especially with new welders:
- Using maximum amperage for all joints
- Ignoring arc length and letting it get too long
- Welding too quickly to finish faster
- Not pausing at the toe of the joint
- Skipping practice on scrap metal
Catch these habits early to improve your welds.
Credit: www.earlbeck.com
How To Fix An Undercut
If you notice undercut after welding, you can repair it:
- Grind out the groove using an angle grinder.
- Clean the area to remove dust or debris.
- Re-weld the joint using lower amperage and better technique.
- Inspect again to make sure the groove is filled.
Fixing undercut takes time but is worth it for safety and strength.
Testing Tee Joints For Quality
A strong tee joint passes both visual and mechanical tests.
- Visual inspection: Look for smooth, even welds with no grooves at the edge.
- Bend test: Bend the joint in a press to see if it cracks at the weld.
- X-ray or ultrasonic test: For critical joints, use advanced tools to check for hidden defects.
Many welding codes set limits for undercut. For example, the American Welding Society (AWS) allows a maximum undercut depth of 0. 8 mm for most structural welds.
Real-world Examples
Let’s look at how these tips work for different jobs:
Welding A Tee Joint In A Trailer Frame
A trailer frame often uses thick steel. If you set the amperage too high, the weld may look good at first but will have deep undercut. This weakens the frame. By lowering the amperage and using a weave motion, you fill the toe and avoid this problem.
Repairing A Broken Table Leg
A thin table leg is easy to melt through. Using TIG welding at low amperage, and pausing at the toe, gives a neat weld without any groove.
Building A Steel Fence
A fence needs many tee joints. If you weld too quickly to save time, you’ll get undercut and the fence could fail after a few years. Slow down and check each weld for quality.
Key Differences: Tee Joint Vs. Other Joints
Tee joints are different from butt, lap, or corner joints. Here’s a summary:
| Joint Type | Shape | Main Risk | Common Use |
|---|---|---|---|
| Tee | T-shaped, 90° | Undercut at toe | Frames, brackets |
| Butt | End to end | Lack of fusion | Pipes, tanks |
| Lap | Overlapping plates | Porosity | Sheet metal |
| Corner | L-shape, 90° | Burn-through | Boxes, frames |
Tee joints need special care at the toe to prevent undercut.
Tools And Accessories That Help
Some tools make welding tee joints easier and safer:
- Welding magnets: Hold pieces at a perfect 90-degree angle.
- Angle grinder: For cleaning and finishing.
- Welding helmet with auto-darkening: Protects your eyes and helps you see the joint.
- Chipping hammer and wire brush: Remove slag and check for undercut.
Using the right tools saves time and improves quality.
Safety Tips When Welding Tee Joints
Welding is safe if you follow these steps:
- Wear gloves, helmet, and fire-resistant clothing.
- Work in a well-ventilated area to avoid fumes.
- Keep flammable materials away from the work area.
- Never touch the electrode or wire with bare hands during welding.
- Keep a fire extinguisher nearby.
Learning And Improving Your Welding Skills
Welding takes practice. If you want to improve, try these steps:
- Weld on scrap metal before working on your project.
- Take pictures of your welds and compare them over time.
- Join a welding class or workshop for hands-on tips.
- Read standards from the American Welding Society for official guidance.
Improvement is steady and measurable if you keep practicing and learning.
Frequently Asked Questions
What Is Undercut And Why Is It Bad?
Undercut is a groove or notch along the edge of a weld bead. It weakens the joint by reducing the thickness at the edge. This makes the joint more likely to break under stress or load.
How Can I Check If My Tee Joint Has Undercut?
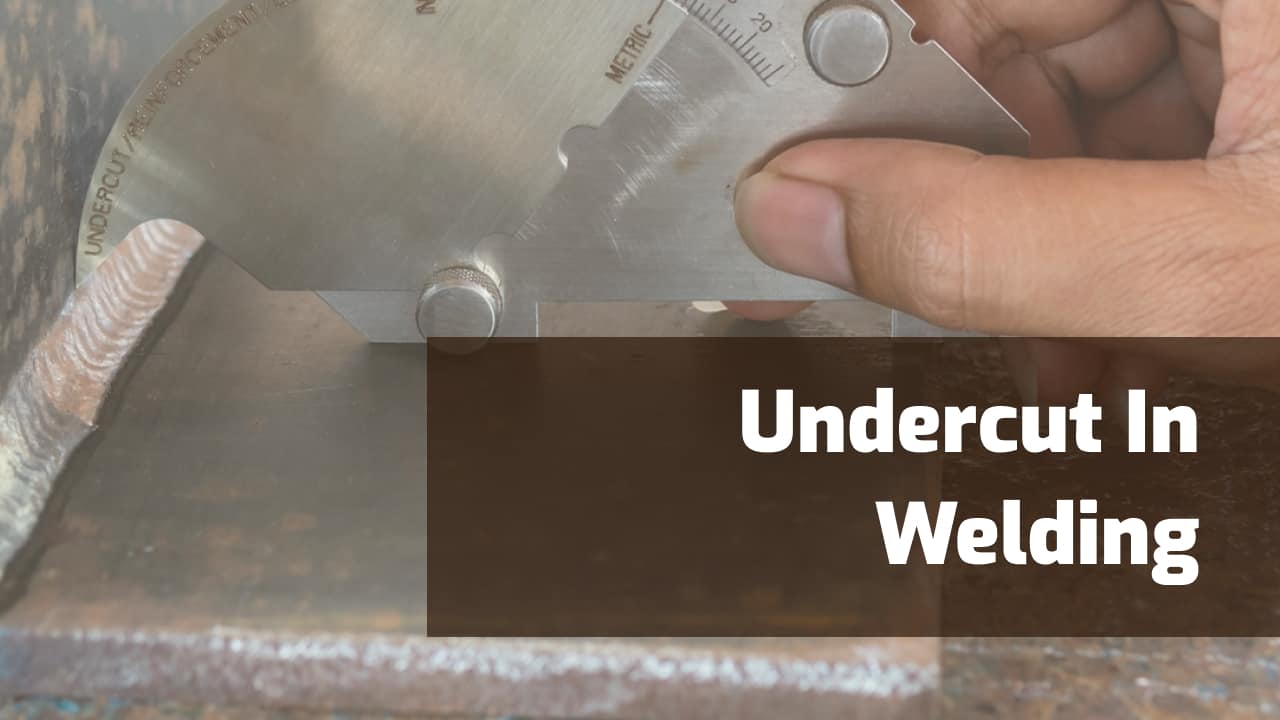
Clean the weld area and look closely at the edge where the weld meets the base metal. If you see a small groove or a shadow line, that is likely undercut. For critical work, use a welding gauge to measure the depth.
What Machine Settings Help Avoid Undercut In Tee Joints?
Use the correct amperage for your electrode or wire size and material thickness. Start with settings from your equipment manual and adjust based on a test weld. Lower the heat if you see undercut starting to form.
Can You Fix Undercut After Welding?
Yes, you can fix undercut by grinding out the groove and re-welding the area with better technique and lower heat. Always inspect the repair to make sure the defect is gone.
Which Welding Process Is Best For Beginners To Avoid Undercut?
MIG welding is often easiest for beginners. It gives good control over heat and speed, and is less likely to cause undercut than stick welding. TIG welding gives the most control but is slower and needs more skill.
Welding a tee joint without undercut is possible with the right preparation, settings, and technique. Practice, patience, and a careful eye for detail help you achieve strong, clean welds every time.

