Disclosure: This post contains affiliate links and I will be compensated if you make a purchase after clicking through my links. Learn More
Welding is a skill that shapes everything from bridges to cars. While many think the process is just about joining metal, real quality welding means understanding small details. One common problem is overlap in horizontal welding. Overlap happens when the molten metal spreads beyond the weld joint, creating weak spots and poor appearance. This can lead to cracks, reduced strength, and even failure in critical structures.
People often struggle with overlap because it is easy to miss the signs until the work is finished. This article explains how to prevent overlap in horizontal welding by breaking down the causes, solutions, and best practices. You will learn how to control your tools, set the right parameters, and use good techniques.
By following these clear steps, you can improve your welds and prevent costly mistakes.
What Is Overlap In Horizontal Welding?
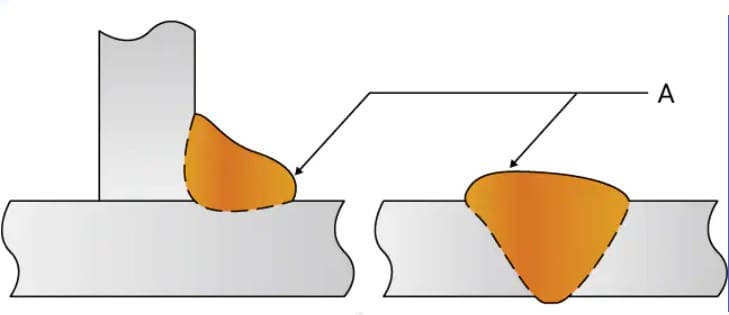
Overlap is a welding defect. It happens when the weld metal flows onto the base metal but does not fuse with it. In horizontal welding, gravity pulls the molten metal down, so it can pile up on the lower edge of the joint. This looks like a lip or shelf and is not part of a strong weld.
Overlap can be dangerous. It may hide cracks or gaps. If you ignore it, the finished piece may break under stress. Professionals know that preventing overlap is easier than fixing it later.
Why Does Overlap Happen In Horizontal Welding?
Overlap is common, especially for beginners. Understanding the reasons helps you stop it before it starts.
1. Incorrect Travel Angle
The angle between the welding gun or electrode and the workpiece matters. A poor angle lets the molten metal flow outside the joint.
2. Too Low Welding Speed
Moving too slowly causes the metal to pile up. This gives gravity more time to pull it down, leading to overlap.
3. Excessive Welding Current
High current melts more metal than needed. The extra metal has nowhere to go except over the edge.
4. Improper Electrode Manipulation
Waving the electrode too much or holding it still can create uneven deposits.
5. Wrong Electrode Size
Using a large electrode produces a wide bead that is hard to control.
6. Incorrect Workpiece Position
Placing the workpiece at the wrong angle can make gravity work against you.
7. Poor Joint Preparation
Dirty or uneven surfaces prevent the weld metal from sticking properly, so it flows outward instead.
Key Effects Of Overlap In Welding
Understanding the impact of overlap helps you see why prevention is important.
- Weak Weld Joints: Overlap reduces the contact between weld and base metal, making joints weaker.
- Crack Formation: Cracks can start at the edge of the overlap, especially under stress or vibration.
- Poor Appearance: Overlap looks rough and unprofessional, which is a problem for visible welds.
- Inspection Failures: Most industry standards do not accept overlap. Your work may not pass inspection.
How To Prevent Overlap In Horizontal Welding
Stopping overlap means using the right settings, techniques, and habits. Each step below addresses a different cause.
1. Set The Correct Welding Angle
The welding angle controls where the molten metal goes. For horizontal fillet welds, use a work angle of about 45 degrees between the plates. Keep the travel angle (the forward angle of the gun) at 5 to 15 degrees.
- Too steep: Causes the weld to overflow.
- Too shallow: Prevents good fusion.
Practice holding the torch or electrode at the same angle all through the weld.
2. Use The Right Welding Speed
Move at a steady pace. Do not slow down too much at corners or ends.
- Too slow: Metal builds up and sags.
- Too fast: Incomplete fusion, undercut, or narrow beads.
Experienced welders say, “Watch the puddle, not just your hand. ” The puddle should stay even and not spill over the joint.
3. Select Proper Welding Current And Voltage
Welding current melts the metal. If it is too high, you get too much molten metal. If it is too low, the metal does not flow well.
- MIG welding: Set amperage and voltage based on wire size and metal thickness.
- Stick welding (SMAW): Match the current to electrode type and size.
Refer to manufacturer charts for guidance. Adjust in small steps until you see a smooth, controlled bead.
Example Welding Current Settings
| Process | Electrode/Wire Size | Recommended Current (A) | Material Thickness (mm) |
|---|---|---|---|
| SMAW | 2.5 mm | 70-90 | 2-4 |
| SMAW | 3.2 mm | 90-130 | 4-6 |
| MIG | 0.8 mm | 60-120 | 1-4 |
| MIG | 1.0 mm | 100-180 | 3-6 |
4. Choose The Right Electrode Or Wire Size
Large electrodes create wide beads that are hard to control in horizontal welding. Start with the smallest size that gives enough penetration.
- For light work: Use 2.5–3.2 mm electrodes.
- For heavier work: Use up to 4 mm, but control the heat.
For MIG welding, thinner wires (0. 8–1. 0 mm) are easier to manage. Check the job requirements before choosing.
5. Prepare The Joint Surface Properly
Dirt, oil, rust, and paint stop the metal from fusing. Clean the joint area with a wire brush or grinder until it is shiny.
- Bevel thick joints to help penetration.
- Remove moisture to avoid porosity.
A clean surface helps the weld metal flow into the joint, not over the edge.
6. Control Electrode Or Gun Manipulation
Your hand movements affect the bead shape. In horizontal welding, use a steady, straight motion or a slight weave (side-to-side).
- Large weaves: Cause overlap and uneven beads.
- Small, controlled movements: Prevent excess metal buildup.
Focus on keeping the puddle near the joint without letting it overflow.
7. Set The Workpiece Position Correctly
Position the work so gravity helps, not hurts. Tilt the joint a few degrees so the lower plate collects less metal.
- For fillet welds: Try a slight upward tilt.
- For butt welds: Support the pieces so the joint is flat.
Good positioning makes it easier to control the weld pool.
8. Control Heat Input
High heat input makes metal too runny. Low heat gives poor fusion.
- Use the lowest current that still gives full penetration.
- Reduce voltage for thinner material.
If you see the puddle spreading, lower the settings.
Comparison: High Vs. Low Heat Input
| Heat Input | Weld Pool Behavior | Risk of Overlap | Common Problems |
|---|---|---|---|
| High | Very fluid, spreads easily | High | Overlap, undercut |
| Low | Stiff, does not flow well | Low | Lack of fusion, porosity |
9. Use The Right Welding Technique
Certain welding techniques control the flow of metal better in horizontal positions.
- Stringer beads: Straight, narrow beads work best.
- Short arcs: Keep the arc close to the work to reduce splatter.
- Push or drag? For MIG, push the gun slightly. For stick, drag the electrode lightly.
Practice helps develop control, but start with the simplest technique until you get consistent results.
10. Keep An Eye On The Weld Pool
Many beginners look at the arc, not the weld pool. The pool tells you where the metal is going.
- If the pool gets too big, speed up or lower the current.
- If it piles up on the lower edge, change your angle.
The best welders adjust as they go, based on what they see.
11. Use Suitable Filler Material
The filler metal should match the base metal in chemistry and melting point. Using the wrong filler makes the weld flow differently.
- For steel, use standard mild steel rods or wire.
- For aluminum, match the alloy type.
Check the manufacturer’s recommendations. Using the wrong filler is a hidden cause of overlap.
12. Follow Standard Welding Procedures
Industries use Welding Procedure Specifications (WPS) for a reason. These documents list all the settings and steps for each job.
- Follow the WPS for the metal type, thickness, and position.
- Do not skip preheat or post-weld steps if required.
If you do not have a WPS, look for guidelines from trusted sources. Following procedures keeps you consistent and safe.
13. Monitor And Adjust During Welding
Always check your work as you go. Stop and look for early signs of overlap: wide beads, shelf-like edges, or sagging metal.
- If you see overlap starting, adjust speed, angle, or current.
- Do not wait until you finish a long weld to check.
This simple habit saves hours of repair time.
14. Practice Good Body Position And Comfort
Welding is physical. If you feel uncomfortable or your arms are tired, your technique slips.
- Stand or sit in a stable position.
- Rest your arms or hands for steady movement.
- Use supports or clamps if needed.
Comfort leads to better control and fewer mistakes.
15. Avoid Common Mistakes
Welders often repeat the same errors, leading to overlap. Here are mistakes to avoid:
- Using default settings for all jobs.
- Ignoring material thickness.
- Skipping joint cleaning.
- Rushing through the weld.
- Using the wrong filler metal.
Awareness of these mistakes is the first step to better welds.
Common Overlap Scenarios And Solutions
Understanding real scenarios helps you apply the advice above.
Scenario 1: Overlap In A Fillet Weld
You start a horizontal fillet weld and see a shelf forming on the lower plate. The bead is wide, and the edge does not blend in.
Solution:
Reduce the welding current. Adjust the angle so the arc points more into the joint. Clean the surface and use a smaller electrode.
Scenario 2: Overlap At The Weld Start
The first few centimeters of the weld have overlap, but the rest looks fine.
Solution:
Start with a short arc and move quickly at the beginning. This prevents metal from piling up before the weld pool is stable.
Scenario 3: Overlap On Thin Sheet Metal
You are welding a thin sheet. The weld metal sags and creates a lip along the joint.
Solution:
Lower the current. Use a thinner wire or electrode. Move faster and use short welds (stitch welding) to control heat.
Scenario 4: Repeated Overlap With New Machine
You switch to a new welding machine and see more overlap than before.
Solution:
Check the settings. Machines may read current or voltage differently. Run a test weld and adjust parameters before starting the real job.
Importance Of Inspection And Testing
Even skilled welders make mistakes. Inspection helps catch overlap early.
- Visual inspection: Look for shelf-like edges or beads wider than the joint.
- Destructive testing: For important welds, cut a sample and check for fusion.
- Non-destructive testing: Use ultrasonic or X-ray tests for high-value parts.
Industry standards such as AWS D1.1 and ISO 5817 describe acceptable weld profiles and defect limits.
Regular testing builds confidence in your skills and the safety of your work.

Credit: weldinganswers.com
The Role Of Welding Position In Overlap
Welding position changes how the molten metal behaves. Horizontal welding is more likely to have overlap than flat or vertical positions. Gravity works sideways in horizontal welding, so the molten pool wants to sag.
Welding Position Comparison
| Position | Gravity Effect | Risk of Overlap |
|---|---|---|
| Flat (1G/1F) | Minimal | Low |
| Horizontal (2G/2F) | Moderate (sideways pull) | High |
| Vertical (3G/3F) | Runs down or up | Medium |
| Overhead (4G/4F) | Pools fall down | Medium |
Knowing this, you should pay extra attention to settings and technique in the horizontal position.
Training And Skill Development
Stopping overlap is not only about settings; it is about skill. Practicing on scrap metal helps you see how small changes affect the bead.
- Try different speeds and angles.
- Watch how the weld pool moves.
- Ask for feedback from experienced welders.
Formal training programs, videos, and books can also help. The American Welding Society (AWS) offers resources for all skill levels.

Credit: ihshotair.com
Non-obvious Insights Most Welders Miss
Even skilled welders sometimes miss these points:
1. Humidity And Temperature Affect Overlap
High humidity or cold metal can make the weld metal flow differently. Preheating thick or cold parts can help get better fusion and less overlap.
2. Electrode Storage Matters
Moisture in electrodes causes spatter and poor flow, which can lead to overlap. Store electrodes in a dry oven or sealed container.
3. Small Beads Are Safer
Many try to finish the weld in one pass. But smaller, multiple beads are easier to control and give fewer defects.
4. Check For Overlap Under Slag
Overlap can hide under the slag layer in stick welding. Always chip and brush the weld before inspection.
5. Different Metals Need Different Settings
Aluminum, stainless steel, and mild steel all behave differently. Use settings and techniques suited to the metal type.
Real-world Example
A small fabrication shop had frequent failures in handrails due to overlap in horizontal welds. The issue was traced to high welding current and dirty surfaces. After retraining staff to use lower current, clean joints, and proper angles, the defect rate dropped by 70%.
This saved repair costs and improved their reputation with clients.
Frequently Asked Questions
Why Is Overlap A Serious Problem In Horizontal Welding?
Overlap is serious because it creates weak joints. The weld metal sits on top of the base metal without fusing, which can cause cracks or break under pressure. Overlap also looks bad and usually fails inspection.
What Is The Ideal Travel Angle To Prevent Overlap?
The best travel angle for horizontal welding is 5 to 15 degrees from vertical, pointing toward the direction of travel. This helps control the weld pool and keeps the bead on the joint.
Can Overlap Be Repaired After Welding?
Yes, but it is best to prevent it. To fix overlap, grind away the affected area and re-weld. This takes extra time and may weaken the joint if not done carefully.
Does Electrode Type Affect Overlap?
Yes. Using the wrong electrode type or size can make it hard to control the weld pool. Use the smallest electrode that gives full penetration and matches the metal type.
Where Can I Learn More About Welding Standards?
You can learn more by reading industry standards like AWS D1.1 or visiting the Welding Wikipedia page for general information.
Final Thoughts
Preventing overlap in horizontal welding is about good habits, not luck. Set the right angles, speeds, and currents. Keep your work clean and your movements steady. Inspect your work often and adjust as needed. Overlap is easy to avoid if you know what causes it and follow proven steps.
With practice, you will see better welds, fewer repairs, and more confidence in your work. Every strong structure starts with strong welds, and every strong weld starts with good technique.
Credit: www.megmeet-welding.com

