Disclosure: This post contains affiliate links and I will be compensated if you make a purchase after clicking through my links. Learn More
Pipe welding connects pipes in oil, gas, water, chemical plants, and many other industries. The way you prepare and fit the pipe ends before welding—called joint design—is one of the most important steps. Good joint design helps make the weld strong, leak-free, and cost-effective. But poor joint design can lead to weak spots, expensive repairs, or even dangerous failures. So, what joint design is best for pipe welding? The answer depends on several factors: pipe size, thickness, material, welding process, code requirements, and the skill of the welder. Understanding these details can save time, money, and trouble.
This guide explains the most common pipe joint designs, their pros and cons, and how to pick the right one for your job. We will also look at how joint design affects welding quality, efficiency, and long-term performance. Along the way, you will see practical tips and real examples that most beginners miss.
Why Joint Design Matters In Pipe Welding
Pipe welds often hold back high pressure, dangerous chemicals, or water. If the joint is weak or not sealed, the consequences can be severe—leaks, explosions, or equipment breakdowns. The way you cut, shape, and fit the pipe ends affects:
- Strength of the weld
- Ease of welding
- Amount of filler metal needed
- Access for inspection and testing
- Cost and speed of the job
A good joint design makes welding easier and safer. It also helps the weld pass inspection, which is necessary for most projects.
Main Types Of Pipe Welding Joint Designs
Different jobs call for different joint designs. Here are the most common ones used in pipe welding:
- Butt Joint (Square Butt, Beveled Butt)
- Socket Weld Joint
- Lap Joint
- Tee Joint
- Corner Joint
- Edge Joint
- Flanged Joint
Each design fits certain pipe sizes, thicknesses, and applications. Below, you will find detailed explanations, pros and cons, and practical advice for each.
1. Butt Joint
The butt joint is the most common design in pipe welding. Two pipe ends are aligned and welded along the edge. There are two main types:
- Square Butt Joint: Pipe ends are cut straight at 90 degrees. Used for thin pipes, usually less than 3mm thick.
- Beveled Butt Joint: Pipe ends are cut at an angle, usually 30–37.5 degrees, to form a V-groove. Used for thicker pipes (more than 3mm).
Advantages
- Provides full penetration welds, which are strong and leak-proof.
- Easy to inspect with X-ray or ultrasonic testing.
- Suitable for high-pressure and critical applications.
Disadvantages
- Needs precise edge preparation.
- Requires skilled welders, especially for thicker pipes.
- For thick pipes, uses more filler material and takes longer.
Where To Use
- Oil and gas pipelines
- High-pressure steam lines
- Chemical process plants
- Power plants
Key Tips
- Always clean and align the pipe ends carefully.
- Use proper root gap (usually 1.5–3mm) for good penetration.
- For pipes thicker than 19mm, sometimes a double V-groove is used to reduce filler metal.
2. Socket Weld Joint
In a socket weld joint, one pipe fits into a recessed area (the socket) of a fitting. The welder makes a fillet weld at the outside edge.
Advantages
- Easy to align, so less risk of misalignment.
- Good for small diameter pipes (usually up to 2 inches).
- No need to bevel pipe ends, saving preparation time.
Disadvantages
- Not suitable for thick-walled or large pipes.
- The gap in the socket can trap fluid, leading to corrosion.
- Hard to clean and inspect inside the joint.
Where To Use
- Small bore piping in high-pressure systems
- Hydraulic and steam lines
- Fire protection systems
Key Tips
- Leave a small gap (about 1/16 inch) between the pipe end and the fitting bottom to allow for expansion.
- Clean the socket thoroughly before welding to avoid contamination.
- Check project codes; some standards restrict socket welds in certain services.
3. Lap Joint
A lap joint uses a special flange that slides over the pipe end, and the pipe ends overlap. Usually, one end is swaged or flared.
Advantages
- Easy to align, even if pipes are not cut perfectly.
- Good for pipes that need frequent removal or reassembly.
- Handles movement or vibration better than some other joints.
Disadvantages
- Not as strong as butt joints.
- Fitting and flanges add to material cost.
- Not suitable for high-pressure or high-temperature services.
Where To Use
- Low-pressure, non-critical pipelines
- Temporary connections
- Food and pharmaceutical plants where cleaning is needed
Key Tips
- Use lap joint flanges made of compatible material.
- Make sure the overlap is at least equal to the pipe wall thickness for strength.
4. Tee Joint
A tee joint forms when one pipe meets another at a 90-degree angle, like the letter T. Used in branch connections.
Advantages
- Good for adding branches or outlets to main lines.
- Can be made with butt or fillet welds.
- Flexible design for complex pipework.
Disadvantages
- Stress concentration at the branch, so not as strong as straight runs.
- Needs reinforcement for high-pressure service.
Where To Use
- Piping manifolds
- Fire sprinkler systems
- Process piping with many outlets
Key Tips
- Use reinforcement pads or set-on tees for high-pressure branches.
- Inspect for cracks at the intersection, which is a weak spot.
5. Corner Joint
A corner joint connects two pipes at their edges, forming a corner. Not common for round pipes, but sometimes used for square or rectangular ducting.
Advantages
- Simple design for non-critical joints.
- Easy to weld.
Disadvantages
- Weak for pressure service.
- Not usually used for round pipe in industrial work.
Where To Use
- Low-stress applications
- Sheet metal ductwork
6. Edge Joint
An edge joint connects the edges of two parallel pipes or plates. Rarely used for pressure pipes, but sometimes for covers or closures.
Advantages
- Easy to fit and weld for thin materials.
- Good for making closures.
Disadvantages
- Not strong enough for pipe carrying fluids under pressure.
- Limited use in pipe welding.
Where To Use
- End caps
- Non-pressure covers
7. Flanged Joint
A flanged joint uses flanges welded or screwed to the pipe ends. Bolts hold the flanges together, with a gasket in between for sealing.
Advantages
- Easy to assemble and disassemble for maintenance.
- Allows for connection of pipes made from different materials.
- Good for large diameter pipes.
Disadvantages
- Bulky and heavy.
- More expensive due to flanges and bolts.
- Risk of leaks if gasket fails.
Where To Use
- Water treatment plants
- Oil refineries
- Pipelines needing regular inspection
Key Tips
- Use the correct gasket material for the fluid and pressure.
- Torque bolts evenly to prevent leaks.
Comparison Of Joint Designs
To see the main differences, here is a simple comparison of the most used joint types:
| Joint Type | Best For | Main Advantage | Main Disadvantage |
|---|---|---|---|
| Butt Joint | High-pressure, thick pipes | Strong, full penetration | Needs skilled welding, prep |
| Socket Weld | Small diameter, high-pressure | Easy alignment | Not for large pipes |
| Lap Joint | Removable pipes | Easy assembly | Lower strength |
| Tee Joint | Branch connections | Flexible layout | Stress at joint |
| Flanged Joint | Large pipes, easy access | Easy maintenance | Bulky, expensive |
Factors That Affect The Best Joint Design Choice
No single joint design is perfect for every job. Here are key factors to consider when choosing:
Pipe Size And Thickness
- Small pipes (under 2 inches): Socket weld or threaded joints are easier.
- Large pipes: Butt joints or flanged joints are more practical.
- Thick-walled pipes: Beveled butt joints for full penetration.
Material Type
- Carbon steel: All joint types work, but some codes limit socket welds.
- Stainless steel: Avoid socket welds in some cases to reduce corrosion risk.
- Non-metallic pipes: Flanged or adhesive joints are common.
Pressure And Temperature
- High pressure/high temperature: Butt joints provide the best strength.
- Low pressure/low temperature: Lap joints or flanged joints are acceptable.
Weld Accessibility
- Limited space: Socket welds or flanged joints may be easier.
- Good access: Butt joints allow for high-quality welds.
Code And Standard Requirements
- Many projects must follow ASME, API, or similar codes.
- Codes may ban certain joint types for specific fluids or pressures.
Cost And Schedule
- Butt joints need more time and skill, but fewer fittings.
- Socket welds are faster for small pipes.
- Flanged joints cost more but save time in maintenance.
How Joint Design Affects Welding Quality
The right joint design makes a big difference in weld quality and inspection results. Some key points:
- Penetration: Butt joints allow full penetration, which is critical for strength.
- Porosity and slag inclusion: Poor fit-up in any joint can trap gases or slag, causing weak spots.
- Access for testing: Butt and flanged joints are easy to test with X-ray or ultrasonic tools.
- Distortion: Large welds in butt joints can cause warping—use proper techniques to avoid this.
A common mistake is using a joint design that looks easy but is hard to weld well. For example, using socket welds for thick or large pipes can lead to hidden defects.
Special Pipe Welding Joint Designs
While the main types above cover most needs, some jobs require special joint designs:
Double-v And Double-u Butt Joints
For very thick pipes, a double-V or double-U groove is used. This means both sides of the pipe are beveled and welded, reducing the amount of filler needed and balancing shrinkage.
J-preparation Joints
Used in automated welding, a J-preparation has one side beveled with a curve. This design saves filler and makes welding easier, especially for thick pipes.
Set-on And Set-in Branch Connections
- Set-On (Stub-On): The branch pipe sits on top of the main pipe, welded all around.
- Set-In (Stub-In): The branch pipe fits into a hole cut in the main pipe, offering better strength and less stress.
These special joints need precise fit-up and skilled welders to avoid leaks and cracks.
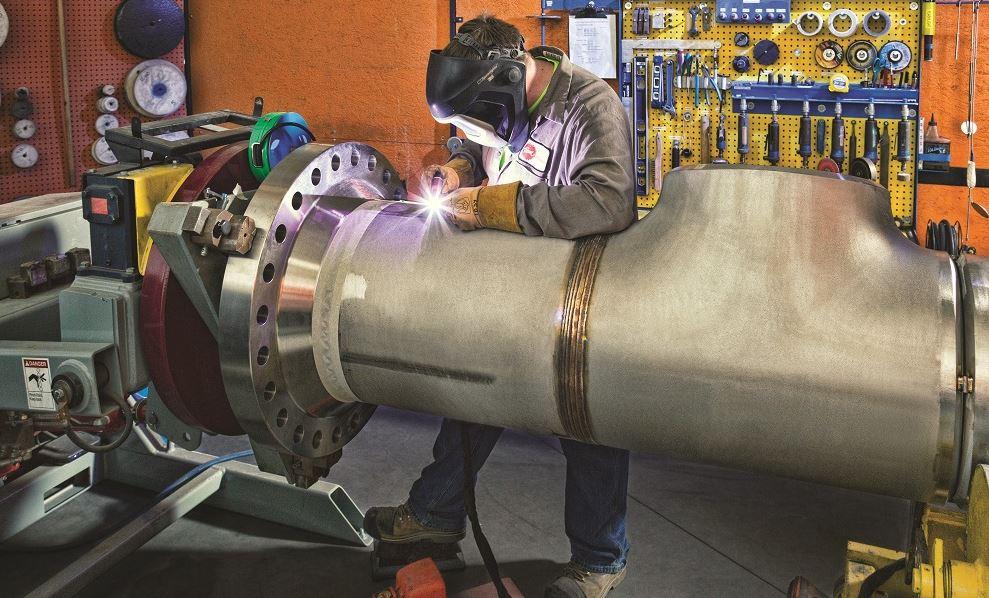
Credit: www.thefabricator.com
Pipe Welding Joint Preparation Steps
Good joint design needs good preparation. Here are the main steps:
- Cutting: Use a pipe cutter, saw, or flame cutter for a straight edge.
- Beveling: For butt joints, bevel the edge at the correct angle using a grinder or machine.
- Cleaning: Remove rust, oil, paint, and dirt from the weld area.
- Fit-up: Align the pipes carefully. Use clamps or fixtures if needed.
- Root gap: Set the right root opening for full penetration.
Poor preparation is a top reason for weld failures, even with the best joint design.
Cost Analysis: Joint Design And Welding
Each joint design affects both material and labor costs. Here’s a cost comparison for a typical 4-inch schedule 40 carbon steel pipe (assuming 10 meters of pipe and 10 joints):
| Joint Design | Material Cost | Labor Time (per joint) | Total Estimated Cost |
|---|---|---|---|
| Butt Joint | Low | 60 minutes | Medium |
| Socket Weld | Medium | 30 minutes | Medium-High |
| Flanged Joint | High | 45 minutes | High |
Butt joints use less material but need more time. Socket welds save time but require fittings. Flanged joints cost more but allow for easy maintenance.
Examples From Industry
Oil And Gas Pipelines
Most long-distance pipelines use beveled butt joints. Welders use automatic welding machines for consistency, and inspectors use X-rays to check for defects. The reason: these joints offer the best strength and leak resistance.
Power Plants
High-pressure steam lines use butt joints with double-V grooves. This design gives a strong weld and reduces the risk of cracks. For smaller pipes, socket welds are used for speed.
Food And Pharmaceutical Plants
Here, cleaning is critical. Lap joints and flanged joints are common because they can be taken apart easily for inspection and cleaning. Welds must be smooth to avoid trapping bacteria.
Two Non-obvious Insights Beginners Miss
- Root gap control: Many beginners do not realize how important the small gap between pipe ends (root gap) is. Too small, and the weld might not penetrate fully. Too large, and the weld can sag or burn through. Always use spacers or gauges to keep the root gap uniform.
- Weld shrinkage: Welding heats up and then cools the metal, causing it to shrink. If you do not plan for this, your pipes may end up misaligned. Experienced welders tack weld the pipes at several points and check alignment after each tack.

Credit: www.sciencedirect.com
Choosing The Best Joint Design For Your Project
Here’s a step-by-step guide to help you pick the best joint design:
- Check pipe size and schedule. For pipes over 2 inches, butt joints are usually best.
- Check pressure and temperature. High-pressure? Use butt joints. Low-pressure? Lap or socket welds may work.
- Review material and code. Stainless steel or special alloys? Check if socket welds are allowed.
- Think about inspection needs. Need X-ray testing? Butt joints are easier to inspect.
- Consider future maintenance. Will you need to take the joint apart? Flanged or lap joints are easier.
- Estimate cost and time. Balance the cost of fittings, labor, and downtime.
If in doubt, consult an experienced welder or engineer. Codes like ASME B31.3 give detailed guidance for many situations.
Practical Tips For Better Pipe Welding Joints
- Always use pipe alignment tools or clamps for butt joints.
- For beveled edges, keep the angle consistent and free from burrs.
- On socket welds, do not push the pipe all the way into the fitting—leave the expansion gap.
- Preheat thick pipes as needed to avoid cracking.
- Clean all surfaces before welding—oil or rust can cause defects.
- Tack weld at three or four points to keep alignment before final welding.
- Inspect each weld visually before moving to the next.
Common Mistakes To Avoid
- Choosing a joint design just because it is easy, not because it is right for the job.
- Ignoring root gap or edge preparation—this leads to weak welds.
- Using socket welds where full penetration is required.
- Not checking for code or standard compliance.
- Skipping cleaning or alignment steps.
Frequently Asked Questions

Credit: www.youtube.com
What Is The Strongest Pipe Welding Joint Design?
The butt joint, especially with full penetration and proper edge preparation, is the strongest pipe welding joint. It can handle high pressure and stress, making it the first choice for pipelines, steam lines, and critical services.
How Do I Know Which Joint Design To Use?
Check the pipe size, thickness, pressure, material, and any code requirements. For large or high-pressure pipes, use butt joints. For small or low-pressure pipes, socket welds, lap joints, or flanged joints may be better.
Can I Use Socket Welds For Stainless Steel Pipes?
It depends. Some codes restrict socket welds for stainless steel because the gap inside the fitting can trap chemicals and cause corrosion. Always check project standards before choosing socket welds for stainless steel.
Why Is Root Gap Important In Pipe Welding?
Root gap controls penetration and weld quality. If the gap is too small, the weld may not bond well. If too large, the weld can sag or create a weak spot. Use the right spacer to keep the gap uniform.
Where Can I Find Official Standards For Pipe Welding Joint Design?
Official standards like ASME B31.3 or API 1104 are available from engineering organizations. For a summary, see Wikipedia’s piping and plumbing fitting page.
Choosing the best joint design for pipe welding is not a simple decision. It requires a good understanding of the job, materials, and safety needs. With careful planning and the right information, you can make strong, safe, and efficient pipe welds every time.

