Disclosure: This post contains affiliate links and I will be compensated if you make a purchase after clicking through my links. Learn More
Choosing the right weld joint for different metal thicknesses can make the difference between a strong, safe structure and one that fails quickly. Whether you build small metal projects at home or work in heavy industries, knowing how to match the weld joint to the material is a core skill.
Many people focus on welding techniques or machine settings, but they miss the impact of joint design. The wrong joint can cause weak spots, waste materials, or lead to failed inspections. This guide explains, in clear steps, how to select the correct weld joint based on metal thickness.
You’ll learn about joint types, their strengths and limits, and how to make smart decisions for your projects. Along the way, you’ll get practical tips, real examples, and expert advice to help you work safer and get better results.
Why Weld Joint Choice Matters For Metal Thickness
Weld joints connect metal pieces. Their shape and style control how well the finished weld handles force, vibration, and pressure. Metal thickness changes how heat moves during welding and how much strength the joint needs. Thin sheet metal can warp or burn through if you use the wrong joint.
Thick plates may need deeper welds to prevent cracks or breaks.
A good joint balances these factors:
- Strength: Does the joint hold up under load?
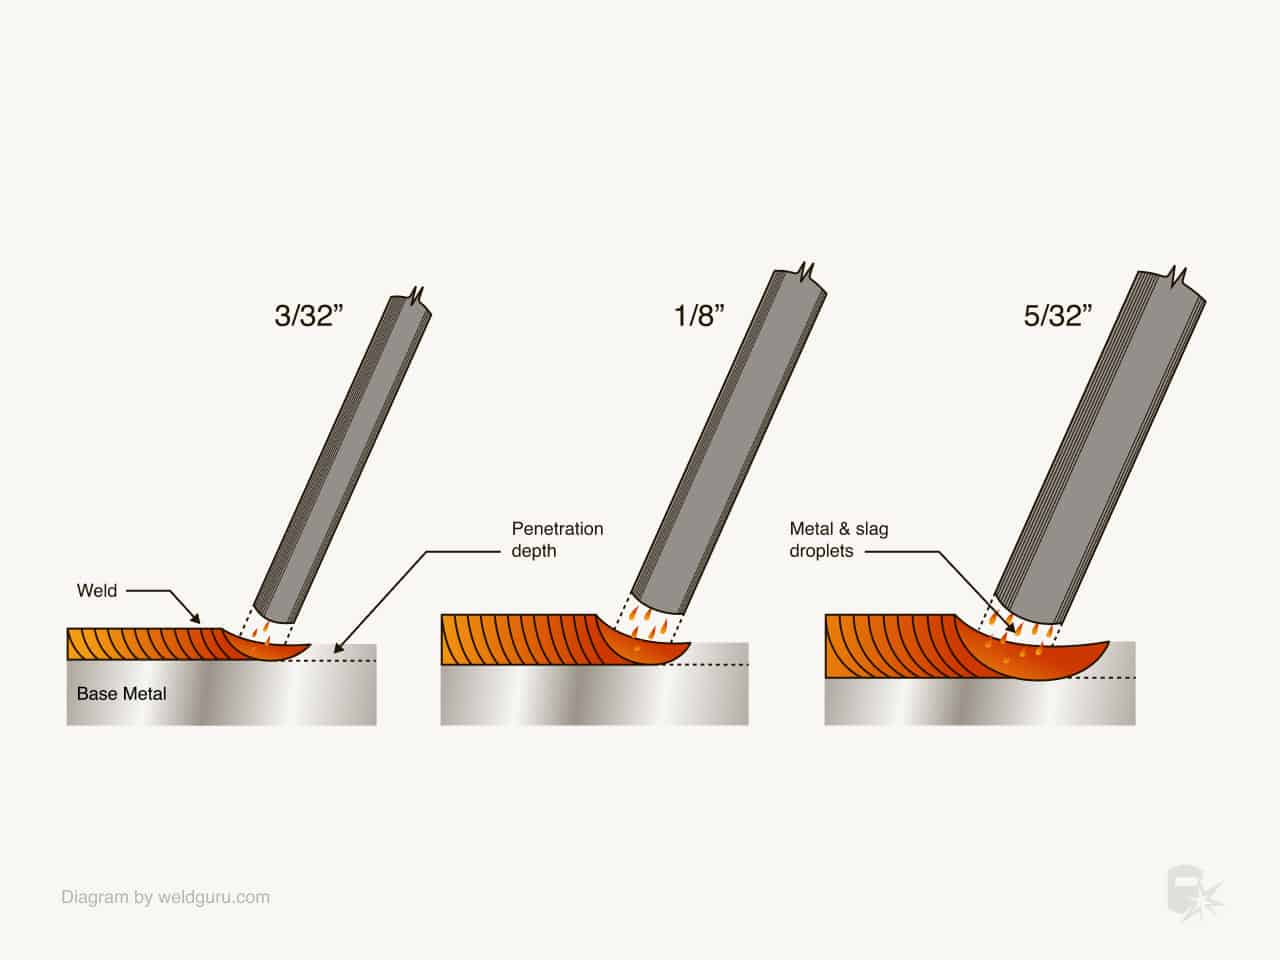
- Penetration: Does the weld melt deep enough into both pieces?
- Distortion: Does it reduce warping or misalignment?
- Ease of Welding: Is it easy for your skill level and equipment?
- Material Use: Does it waste less metal or filler?
A poor match often leads to rework, wasted time, or even dangerous failures. Industry data shows that up to 60% of weld failures start at the joint, not the weld bead itself.
Main Types Of Weld Joints
You can group weld joints into five main types. Each suits different thicknesses and applications. Here’s a closer look at each:
1. Butt Joint
A butt joint joins two pieces end-to-end in the same plane. This joint is simple and common for many thicknesses.
- Thin Metals (up to 3 mm): Use a square edge, no groove. Weld both sides if possible.
- Medium Metals (3–12 mm): Add a single-V or double-V groove to allow deeper weld penetration.
- Thick Metals (over 12 mm): Always bevel edges (single or double-V) for full strength and penetration.
Strength: High if welded correctly on both sides.
Common uses: Pipes, structural beams, sheet metal panels.
2. Corner Joint
A corner joint connects two pieces at a right angle, forming an L-shape.
- Thin Metals: Use a fillet weld. Keep weld size small to avoid warping.
- Medium/Thick Metals: Increase weld size or use groove weld for extra strength.
Strength: Medium to high, but can be weak if undercut.
Common uses: Frames, boxes, enclosures.
3. Tee Joint
A tee joint joins one piece at a 90-degree angle to the center of another, forming a T.
- Thin Metals: Fillet weld on one or both sides. Control heat to avoid burn-through.
- Thicker Metals: Larger fillet welds or add groove for strength.
Strength: High if welded both sides.
Common uses: Base plates, stiffeners, support structures.
4. Lap Joint
A lap joint overlaps two pieces. Weld along one or both edges.
- Thin Metals: One or two small fillet welds. Good for spot welding.
- Thicker Metals: Increase overlap and weld length for strength.
Strength: Medium, best for shear loads.
Common uses: Sheet metal work, auto panels, ducting.
5. Edge Joint
An edge joint joins the edges of two parallel pieces, often with a small gap.
- Thin Metals: Use for covers or panels where strength is less important.
- Thick Metals: Not common, as not strong enough for heavy loads.
Strength: Low.
Common uses: Sheet metal boxes, tanks, light enclosures.

Credit: yeswelder.com
Matching Weld Joint To Metal Thickness
The right weld joint depends on how thick your metal is. Each thickness range has its own needs and risks. Here’s how to decide for each range:
Thin Metals (up To 3 Mm)
Thin metals are common in auto body, HVAC, and small fabrication work. They are easy to distort or burn through.
Best joint types:
- Butt joint (square edge, minimal gap)
- Lap joint (short fillet or spot weld)
- Corner joint (small fillet)
Tips:
- Use lower heat settings.
- Clamp tightly to prevent warping.
- Avoid large weld beads.
Common mistake: Using a wide groove or large weld, which causes burn-through and weakens the metal.
Example: Welding 1.5 mm steel for a car fender. A square butt joint or small lap joint gives good strength with low risk of burn-through.
Medium Thickness Metals (3–12 Mm)
This range covers most building frames, machinery parts, and heavier equipment.
Best joint types:
- Butt joint (single-V groove)
- Tee joint (fillet weld both sides)
- Corner joint (medium fillet or partial groove)
Tips:
- Bevel edges for deeper welds.
- Use back gouging for extra penetration if welding both sides.
- Control heat input to avoid excess distortion.
Common mistake: Not preparing the edges. Without a groove, weld may not penetrate fully, leading to weak spots.
Example: Welding 8 mm steel plate for a base frame. Use a single-V butt joint, weld both sides, and check penetration with test pieces.
Thick Metals (over 12 Mm)
Heavy structures and pressure vessels use thick metal. These need deep welds and often pass strict inspections.
Best joint types:
- Butt joint (double-V groove for very thick pieces)
- Tee joint (large fillet or full penetration groove)
- Corner joint (full groove for high strength)
Tips:
- Use multi-pass welding.
- Preheat thick sections to avoid cracks.
- Remove slag between passes.
Common mistake: Not beveling both sides. This leaves a weak “root” and can cause weld failure under heavy loads.
Example: Welding 25 mm steel plate for a bridge support. Double-V butt joint, weld both sides, test with ultrasonic inspection.
Detailed Comparison Of Weld Joints For Thickness
Choosing the right joint type for a given thickness can be confusing. Here’s a side-by-side view to help:
| Joint Type | Best for Thin (≤3mm) | Best for Medium (3–12mm) | Best for Thick (>12mm) | Notes |
|---|---|---|---|---|
| Butt | Square edge, single pass | Single-V groove, multi-pass | Double-V groove, multi-pass | Most versatile, strong if prepared well |
| Corner | Small fillet | Medium fillet/groove | Full groove | Good for frames and boxes |
| Tee | Small fillet | Both sides fillet | Full penetration groove | Strong under vertical loads |
| Lap | Spot or short fillet | Longer fillet | Not common | Best for thin sheets |
| Edge | Light covers | Rare use | Not recommended | Low strength |
Groove Preparation And Its Role
Grooves help welds penetrate deeper into thick metals. The type and size of groove depends on thickness and access.
Types Of Groove Preparation
- Square Groove: No bevel. For thin metals.
- Single-V Groove: One beveled edge, other flat. For medium thickness.
- Double-V Groove: Both edges beveled. For thick plates, reduces weld metal use.
- U-Groove: Rounded groove, often for thicker materials where fatigue is a risk.
- J-Groove: One side beveled as a “J.” Used when access is limited.
Why it matters:
A groove lets the weld reach the full depth of the joint. Without a groove, thick plates may only fuse at the top, leaving an unbonded root. This weakens the joint and can cause cracks.
Pro tip: For plates thicker than 12 mm, a double-V groove reduces the amount of filler metal needed and limits distortion.
Practical Steps To Choose The Correct Weld Joint
Here’s a step-by-step way to decide which joint to use for your job:
- Measure the metal thickness. Use a caliper or gauge for accuracy.
- Check the load and use case. Will it hold heavy loads, or is appearance more important?
- Pick a joint type. Use the comparison table above.
- Decide on groove shape if needed. For anything above 3 mm, plan for edge prep.
- Plan weld size and type. Check welding codes or standards for minimum sizes.
- Test on scrap. Weld a sample and check for penetration, strength, and distortion.
- Adjust. Change groove, weld size, or joint type if the test fails.
- Document. Keep a record of settings and joint prep for future jobs.
Non-obvious insight: Many beginners skip the test weld step. Even experienced welders can miss hidden problems by not checking with scrap first.
Credit: weldguru.com
Effects Of Welding Position On Joint Choice
Welding position (flat, horizontal, vertical, overhead) changes how easy it is to get full penetration and control the weld pool. Some joints are easier in certain positions:
- Flat position: Easiest for most joints, best for thick plates and butt joints.
- Vertical/Overhead: Harder to control heat; lap and tee joints are more forgiving.
- Horizontal: Good for fillet welds, but watch for sagging.
Practical tip: If you must weld overhead or vertical, pick a joint that lets you use smaller, multiple passes to control the pool and avoid drips.
Joint Design For Special Metals
Some metals need special care because of their properties:
- Aluminum: Melts quickly; thin sheets need lap or corner joints with tight fit. Avoid wide grooves.
- Stainless Steel: Warps easily; use small beads, tight joints. Tee and lap joints help limit distortion.
- Cast Iron: Brittle; use preheat, short welds, and avoid heavy groove joints.
Example: When welding 2 mm aluminum, a lap joint with TIG welding and low heat gives the best results.
Credit: yeswelder.com
Welding Codes And Standards
Many industries use standards to set minimum joint sizes and prep for safety. For example, the American Welding Society (AWS) and ISO have tables showing required weld sizes for each thickness.
Why follow codes?
- Prevent weak joints
- Pass inspections
- Ensure long-term safety
Non-obvious insight: Codes often set minimum sizes, not maximum. Oversized welds may waste material and cause extra distortion.
For more details, you can check official standards from American Welding Society.
Common Mistakes And How To Avoid Them
1. Using the wrong joint for metal thickness
Trying to weld thick plates with square butt joints leaves weak areas. Always bevel for anything over 3 mm.
2. Skipping edge preparation
Not cleaning and beveling edges causes poor fusion. Use a grinder or torch for clean, even bevels.
3. Ignoring fit-up gaps
Too large a gap causes burn-through; too small leads to lack of penetration. Match gap to filler and process.
4. Over-welding
Making welds larger than needed wastes filler and distorts the metal.
5. Not checking penetration
Assuming full fusion without testing can result in hidden cracks. Always test on scrap.
Safety Considerations
The right weld joint does more than add strength. It also:
- Reduces risk of sudden failure
- Ensures even stress distribution
- Lowers chance of leaks (for tanks or pipes)
- Meets legal and insurance requirements
Always use proper PPE, and never cut corners on joint prep or design for critical jobs.
Practical Examples: Choosing Weld Joints In Real Projects
To see how joint choice works in the real world, let’s look at some typical jobs:
Welding Thin Sheet Metal (1.5 Mm)
You want to repair a car door panel. The metal is thin and warps easily. You pick a lap joint with small spot welds every 25 mm. This keeps the panel flat and avoids burn-through. You clamp the pieces tightly, use low amperage, and check fit-up before welding.
Building A Structural Frame (10 Mm Plate)
You need to join two 10 mm plates for a machine base. You bevel both edges to make a single-V groove. You weld both sides using several passes, checking penetration after each pass. This setup follows AWS codes for structural strength.
Heavy Equipment Repair (20 Mm Plate)
You repair a loader bucket made from 20 mm steel. You grind a double-V groove to reduce weld metal. You preheat the area to 200°C to prevent cracking. Multi-pass welding fills the groove, and you check with ultrasonic testing to ensure full penetration.
Data: Weld Strength Vs. Joint Type And Thickness
Here is a summary of how joint type and thickness affect weld strength:
| Thickness (mm) | Joint Type | Groove | Typical Weld Strength (MPa) | Notes |
|---|---|---|---|---|
| 1.5 | Lap | None | 270 | Good for thin sheets |
| 6 | Butt | Single-V | 410 | Strong, minimal distortion |
| 15 | Butt | Double-V | 480 | High strength, less filler |
| 10 | Tee | Fillet | 390 | Good for load-bearing |
Expert Tips For Better Weld Joint Selection
- Always prep edges for thick plates. It saves time on repairs later.
- Match filler metal to both base metal and thickness.
- Preheat thicker sections to avoid cracks.
- Use the smallest weld that meets code. Oversize welds often cause problems.
- Keep records of your settings and joint prep for repeat jobs.
- Test, test, test. Do not skip test welds, especially for new materials or designs.
Frequently Asked Questions
What Is The Strongest Type Of Weld Joint For Thick Metal?
A double-V groove butt joint gives the highest strength for thick metals. It allows for full penetration welds on both sides and uses less filler metal than a single-V groove.
How Do I Stop Thin Metal From Warping During Welding?
Clamp the pieces tightly, use smaller welds, and alternate sides as you weld. Lap joints and small fillet welds help spread heat and reduce warping.
Do I Always Need To Bevel Thick Metal Before Welding?
Yes, for metals over 3 mm thick, beveling (creating a groove) is critical for full penetration. Without it, the weld may not reach the root, causing weak spots.
Can I Use The Same Weld Joint For All Metal Thicknesses?
No. Each thickness range has a best-suited joint. Butt joints work for all, but need different groove prep. Lap and edge joints are only good for thin metals.
How Can I Check If My Weld Penetrated Fully?
Cut and etch a test weld, or use non-destructive tests like ultrasonic or X-ray inspection. Visual checks alone are not enough, especially for thick materials.
Final Thoughts
Choosing the correct weld joint for metal thickness is more than a technical detail—it’s a key part of building safe, reliable structures. The right joint ensures strong, lasting welds, saves time and material, and avoids costly repairs. Always consider metal thickness, joint type, groove prep, and position before you strike an arc.
Test your setup, follow industry codes, and keep learning from every project. With care and planning, you can weld with confidence and skill, no matter what the job demands.

