Disclosure: This post contains affiliate links and I will be compensated if you make a purchase after clicking through my links. Learn More
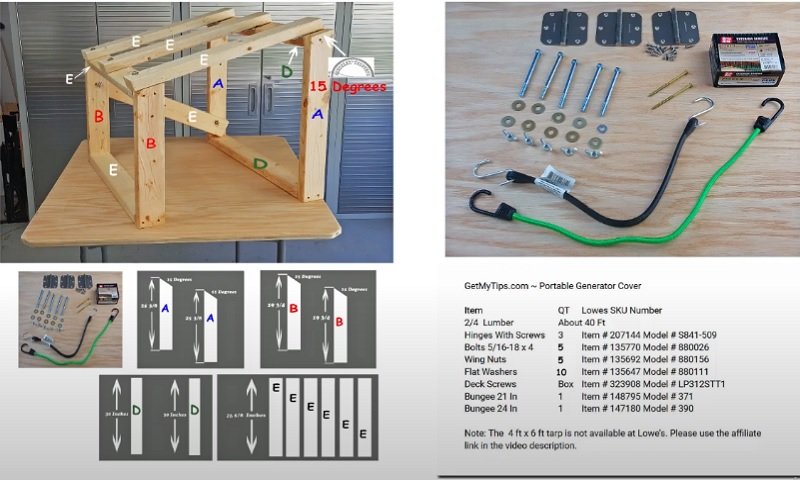
To build a cover for a generator, measure the generator’s dimensions and select durable materials like plywood or metal sheets. Assemble the structure with proper ventilation and weatherproofing.
Generators need protection from harsh weather conditions and potential damage. A well-built cover ensures your generator remains functional and efficient. Start by taking accurate measurements of your generator. Choose sturdy materials such as plywood, metal sheets, or heavy-duty plastic. Ensure the cover allows adequate ventilation to prevent overheating.
A slanted roof design helps with rainwater drainage. Secure all parts firmly to withstand wind and other elements. Add a door or removable panel for easy access during maintenance. Properly sealing the edges keeps out moisture and debris.

Materials Needed
Building a cover for your generator ensures its protection from weather elements. To get started, you need the right tools and materials. This section covers everything you need to prepare before starting your project.
Essential Tools
Having the right tools is crucial for a smooth construction process. Below is a list of essential tools you will need:
- Measuring Tape: For accurate measurements.
- Electric Drill: To make holes for screws.
- Jigsaw: To cut wood or metal sheets.
- Screwdriver Set: For tightening screws.
- Hammer: For driving in nails.
- Level: To ensure even surfaces.
- Safety Gear: Gloves and goggles for protection.
Recommended Materials
Choosing the right materials will ensure the durability of your generator cover. Here’s a list of recommended materials:
| Material | Purpose |
|---|---|
| Plywood Sheets | For the main structure. |
| Metal Sheets | For added protection. |
| Wood Screws | To hold the structure together. |
| Weatherproof Paint | To protect against elements. |
| Sealant | To prevent water leakage. |
Ensure all materials are of high quality. This will provide longevity to your generator cover.
Preparing The Workspace
Before you start building a cover for your generator, it is crucial to prepare your workspace. This step ensures safety and efficiency during the project. Below are the steps involved in preparing your workspace, detailed under two main headings.
Choosing The Right Location
Choose a flat and spacious area for your workspace. Ensure the space is well-ventilated. Good ventilation helps to avoid inhaling fumes. Keep the workspace away from flammable materials. This reduces the risk of fire hazards. Select a location with adequate lighting. Proper lighting helps you see your tasks clearly.
Gathering Supplies
Gather all necessary tools and materials before starting. This helps you stay organized and focused. Here is a list of supplies you will need:
- Measuring Tape: For accurate measurements.
- Wood or Metal Sheets: Depending on your cover choice.
- Screws and Nails: For securing the cover components.
- Screwdriver or Drill: To fasten screws and nails.
- Hammer: Useful for driving nails.
- Paint and Brush: For finishing touches.
Make sure you have all the items listed above. Having everything at hand saves you time and energy. If you use power tools, wear protective gear. This includes gloves and safety glasses.
| Tool | Purpose |
|---|---|
| Measuring Tape | Accurate measurements |
| Wood or Metal Sheets | Material for the cover |
| Screws and Nails | Securing components |
| Screwdriver or Drill | Fasten screws and nails |
| Hammer | Driving nails |
| Paint and Brush | Finishing touches |
Organize your tools neatly. This makes it easier to find what you need. With your workspace prepared, you are ready to build the generator cover.
Measuring The Generator
Before building a cover for your generator, you need accurate measurements. Proper dimensions ensure the cover fits perfectly and protects your generator from elements.
Dimensions To Note
Note the following critical dimensions:
- Length: Measure from the front to the back.
- Width: Measure from side to side.
- Height: Measure from the base to the top.
Record these dimensions carefully. Even a small error can lead to a poor fit.
Tips For Accurate Measurements
Follow these tips to ensure accuracy:
- Use a reliable tape measure: Ensure the tape is not stretched.
- Measure twice: Verify each dimension to avoid mistakes.
- Account for accessories: Include handles and wheels in your measurements.
- Record measurements: Write down each value immediately to avoid confusion.
Use a table to organize your measurements:
| Dimension | Measurement (in inches) |
|---|---|
| Length | |
| Width | |
| Height |
Remember, precise measurements ensure a perfect fit for your cover.

Cutting The Materials
Building a cover for your generator involves several crucial steps. One important step is cutting the materials. This section will guide you through the process, ensuring you have the right pieces for your cover.
Cutting The Frame
The frame supports the entire structure. You need strong and durable materials. Here’s a simple list of what you need:
- Metal pipes or wooden beams
- Measuring tape
- Marker or pencil
- Saw or pipe cutter
First, measure the dimensions of your generator. Add extra space for ventilation. Mark these measurements on your frame materials. Use a saw or pipe cutter to cut the pieces. Double-check the lengths before cutting to avoid mistakes. Lay out the pieces to ensure they fit correctly.
Preparing The Panels
The panels provide the cover for your generator. You need materials that are weather-resistant. Common choices are plywood, metal sheets, or plastic panels. Here’s a list of tools you’ll need:
- Panel materials (plywood, metal sheets, or plastic)
- Measuring tape
- Marker or pencil
- Jigsaw or metal snips
Measure the dimensions for each side of the generator. Mark these measurements on your panel materials. Use a jigsaw or metal snips to cut the panels. Make sure the panels are slightly larger than the frame. This ensures a snug fit and good protection. Smooth the edges with sandpaper to avoid sharp edges.
Follow these steps to ensure your generator cover fits perfectly. Properly cut materials make assembling easier and more efficient.
Assembling The Frame
Building a cover for your generator is a great idea. It protects your investment from harsh weather. The key step is installing the panels. This step involves attaching the sides and securing the top. Let’s dive into the details of these steps.
Attaching The Sides
First, gather all your side panels. Ensure they fit the frame perfectly. Use screws or bolts to attach them. Start with one corner and work your way around.
Materials Needed:
- Screws or bolts
- Drill
- Measuring tape
- Level
Make sure each panel is level before securing it. This ensures a sturdy structure. Double-check your measurements to avoid gaps. Gaps can let in rain or snow.
Securing The Top
Next, place the top panel on your frame. Ensure it fits snugly. Use screws or bolts to secure it. Start from the center and move to the edges.
Steps to Secure the Top:
- Place the top panel on the frame.
- Check for fit and alignment.
- Secure the center with screws.
- Work your way to the edges.
- Ensure all screws are tight.
Consider adding a sealant around the edges. This keeps out moisture. It’s a small step that makes a big difference.
With the sides and top secured, your generator cover is almost complete. It’s sturdy and ready to protect your generator. Always use quality materials for durability.
Installing The Panels
You’ve built your generator cover. Now, let’s add the finishing touches. This ensures the cover is both durable and functional.
Weatherproofing Tips
Weatherproofing protects your generator from rain, snow, and sun. Here are some essential tips:
- Seal all joints and seams: Use waterproof sealant on all connections.
- Apply a weatherproof coating: Choose a high-quality paint or varnish.
- Install rubber gaskets: Place these around any openings to keep water out.
Consider using a waterproof tarp. It adds an extra layer of protection. Ensure it is secured tightly to avoid flapping in the wind.
Adding Ventilation
Generators need proper ventilation to prevent overheating. Follow these steps to add ventilation:
- Drill ventilation holes: Place holes on the sides or back of the cover.
- Install ventilation grilles: These help keep debris out while allowing air to flow.
- Add a small fan: Use a battery-powered fan to improve airflow.
Ensure the ventilation system is not obstructed. Good airflow extends the life of your generator.
Consider placing a mesh screen over the ventilation holes. This keeps out insects and small animals.
Finally, check the ventilation regularly. Clean any blockages to maintain efficiency.
Finishing Touches
Maintaining your generator cover ensures it lasts longer and stays effective. Regular care prevents damage and keeps your generator protected. Follow these simple maintenance tips to keep your cover in top shape.
Regular Inspections
Conduct regular inspections to identify any signs of wear or damage. Look for tears, holes, or loose seams. Check the fasteners to ensure they are secure. Inspect for any mold or mildew, especially after wet conditions.
Repairs And Upkeep
Perform repairs promptly to prevent further damage. Use a patch kit for small tears or holes. Replace any broken fasteners or straps. Clean the cover regularly to remove dirt and debris. Use mild soap and water for cleaning. Allow the cover to dry completely before reapplying.
| Maintenance Task | Frequency |
|---|---|
| Inspect for damage | Monthly |
| Clean the cover | Every 3 months |
| Repair tears | As needed |
| Replace fasteners | As needed |
Following these simple steps will extend the life of your generator cover. Keeping it in good condition ensures your generator remains protected.
Read Here: How to Build a Soundproof Box for a Generator
Frequently Asked Questions
How Do You Build A Generator Cover?
To build a generator cover, use weather-resistant materials like treated wood or metal. Ensure proper ventilation.
What Materials Are Best For Generator Covers?
Treated wood, metal, and heavy-duty plastic are ideal for generator covers due to their durability and weather resistance.
Can A Generator Cover Improve Performance?
Yes, a well-designed cover protects the generator from elements, ensuring optimal performance and longevity.
Do Generator Covers Need Ventilation?
Yes, proper ventilation is crucial to prevent overheating and ensure safe operation of the generator.
Conclusion
Building a cover for your generator is a simple yet crucial task. It protects your equipment from weather damage. Follow the steps mentioned and use quality materials. Regular maintenance ensures longevity and reliability. With this guide, your generator will stay safe and functional for years.
Enjoy the peace of mind it brings.


