Disclosure: This post contains affiliate links and I will be compensated if you make a purchase after clicking through my links. Learn More
To make a generator bonding plug, connect the neutral (white) terminal to the ground (green) terminal inside the plug using a short wire. Do not connect the hot (black) terminal—it remains unused.
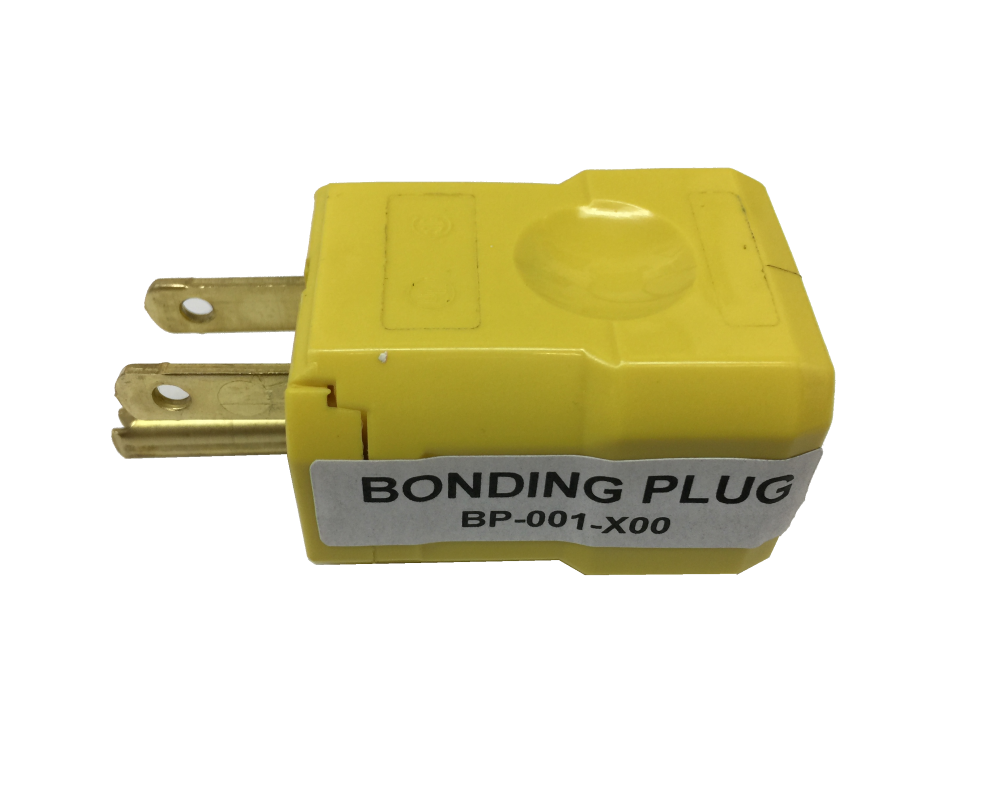
Creating a generator bonding plug is essential for safety when using a portable generator. This device helps prevent electrical shocks by providing a direct path for electrical current to return to the generator, ensuring the generator’s circuit breaker can function correctly.
Typically, a generator bonding plug connects the ground and neutral pins within a 3-prong plug. This simple, yet crucial, tool ensures that your generator operates safely, especially when connected to your home’s electrical system. Follow straightforward steps to make your own bonding plug, ensuring that all connections are secure to maintain safety and efficiency.
Tools And Materials
To create a reliable generator bonding plug, having the right tools and materials is essential. This section will guide you through the necessary equipment and supplies. Each item is crucial for ensuring safety and functionality.
Required Tools
- Wire Strippers: Useful for removing insulation from wires.
- Wire Cutters: Needed to cut the wires to the correct length.
- Multimeter: Helps in checking the connection and continuity.
- Screwdriver: Used for tightening screws on the plug.
- Needle Nose Pliers: Helps in bending and shaping wires.
Necessary Materials
| Material | Description |
|---|---|
| 15/20A or 30A Plug | Use a NEMA 5-15R (15/20A) or L5-30R (30A) replacement plug. |
| 12/14-Gauge Wire | Short stripped copper wire (2–3 inches) to bond neutral and ground. |
| Electrical Tape | For covering unused hot terminals (if applicable). |

Preparing The Work Area
Before making a generator bonding plug, preparing the work area is crucial. A well-prepared area ensures safety and efficiency. Below, we detail how to choose a safe location and set up your tools.
Choosing A Safe Location
Start by selecting a safe location for your work. Ensure the area is well-ventilated and free of clutter. Avoid working near flammable materials.
Consider the following factors when selecting your work area:
- Ventilation: A well-ventilated space prevents inhalation of fumes.
- Lighting: Good lighting helps you see clearly and avoid mistakes.
- Space: Ensure there is enough room to move around comfortably.
Setting Up Your Tools
Gather all the tools you need before starting. This includes:
| Tool | Purpose |
|---|---|
| Screwdriver | For tightening screws |
| Wire Stripper | For stripping wire insulation |
| Multimeter | For testing electrical connections |
Place your tools within easy reach. Arrange them in an orderly manner.
Use a toolbox or tool belt for organization. This reduces the time spent looking for tools.
Follow these steps to ensure a smooth and safe process. Proper preparation makes the job easier and safer.
Wiring The Plug
Wiring the plug is a key step in making a generator bonding plug. Follow these steps to ensure a safe and effective connection. Focus on each step to avoid mistakes.
Stripping The Wires
First, gather your materials. You will need a wire stripper, electrical tape, and the wires. Cut the wires to your desired length. Use the wire stripper to remove the insulation. Strip about 1/2 inch from the ends of each wire.
- Use the wire stripper carefully.
- Check for exposed copper.
- Ensure the wires are clean and undamaged.
Connecting The Wires
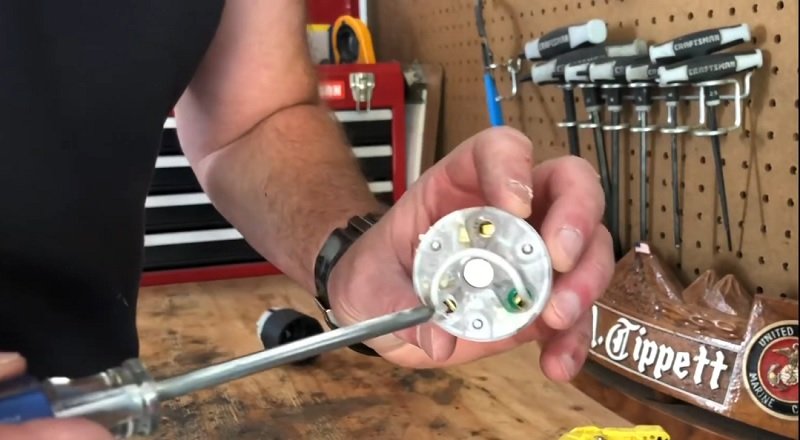
Next, connect the stripped wires to the plug. Look at the plug’s terminals. There should be three terminals: hot, neutral, and ground.
Insert one end of the stripped wire into the neutral (white) terminal and the other end into the ground (green) terminal. Tighten both screws securely. Leave the hot (black) terminal empty—no connection is needed here.
Use a screwdriver to tighten the connections. Make sure the wires are secure. Wrap the connections with electrical tape for safety.
Here’s a simple table for quick reference:
| Wire Color | Terminal |
|---|---|
| Black | Hot |
| White | Neutral |
| Green | Ground |
Double-check your connections. Ensure there are no loose wires. Your plug should now be wired correctly and ready for use.
Assembling The Plug
Creating a generator bonding plug is a simple task. It ensures safe operation of your generator. This section focuses on assembling the plug.
Inserting The Wires
First, gather all the necessary tools. You need a wire stripper, screwdriver, and the bonding plug.
Next, strip the ends of the wires. Use the wire stripper to remove about 1/2 inch of insulation.
Then, insert the stripped wires into the plug terminals. Ensure they fit snugly.
Securing The Connections
Once the wires are in place, it’s time to secure them. Use the screwdriver to tighten the terminal screws.
Make sure the connections are firm. Loose wires can cause malfunctions.
Finally, double-check all connections. Ensure every wire is secure and in the correct terminal.
Below is a quick summary in a table format:
| Steps | Tools Needed |
|---|---|
| Gather Tools | Wire stripper, screwdriver, bonding plug |
| Strip Wire Ends | Wire stripper |
| Insert Wires | Bonding plug |
| Secure Connections | Screwdriver |
By following these steps, you can easily assemble a generator bonding plug.
Building a 30 Amp Bonding Plug
Why This Matters
Many RV owners use 30A generators (e.g., Westinghouse iGen4500) but struggle to bond them. A 30A plug solves this while freeing up smaller outlets for other devices.
Step-by-Step Guide
- Gather Tools: You’ll need a NEMA L5-30R twist-lock plug (ideal for most 30A inverter generators) and 12-gauge copper wire.
- Disassemble the Plug: Unscrew the casing to access the terminals.
- Bond Neutral & Ground: Connect the white (neutral) terminal to the green (ground) terminal using a 3-inch stripped 12-gauge wire. Leave the hot (black) terminal empty—no connection is needed.
- Reassemble & Secure: Close the plug, tighten the screws, and cover unused terminals with electrical tape.
- Test & Label: Plug into your generator’s 30A outlet and check your EMS for ground faults. Label the plug “30A – GENERATOR USE ONLY” to avoid confusion.
Cost Comparison
Store-bought 30A bonding plugs cost 20–20–25, but a DIY version can be built for 10–10–15 using affordable parts like this NEMA L5-30R plug and 12-gauge wire.
Pro Tips
Store bonding plugs with your generator—not in your general toolbox—to prevent accidental misuse. Some generators, like the Predator 3500, offer a factory bonding screw option instead of requiring a plug. For peace of mind, consider a pre-made RVIA-certified plug like this Hughes Autoformers model.
Testing The Bonding Plug
Testing your generator bonding plug is crucial for safety. This ensures the plug works correctly. Follow these steps for a thorough check.
Initial Safety Checks
- Turn off the generator before testing.
- Disconnect all devices from the generator.
- Inspect the bonding plug for any visible damage.
- Wear insulated gloves for extra safety.
Performing these checks helps prevent accidents. Safety is always the priority.
Conducting A Test Run
Follow these steps to conduct a proper test run:
Plug the bonding plug into your generator, then connect your RV. Check your EMS/surge protector:
- Red light/grid fault: Bonding failed.
- Green light: Success! Neutral and ground are safely bonded.
Double-check the bonding plug connections.
Repeat the test to confirm consistent results. This ensures your generator is safe to use.
Testing your bonding plug is a simple but vital task. Always prioritize safety to avoid hazards.
Critical Safety Notes
Creating a bonding plug is simple, but misuse can lead to fire, electrocution, or costly damage. Follow these critical rules to stay safe:
Never Use at Campgrounds or Homes
Campground pedestals and home electrical panels already bond neutral and ground. Adding your plug creates a redundant bond, allowing electricity to flow through dangerous paths like your RV’s metal frame or plumbing. For example, plugging your DIY bonding plug into a campground pedestal could electrify surfaces like your RV’s shower handle or sink, posing a lethal shock risk.
Label Clearly
Use a permanent marker or label maker to write “FOR GENERATOR USE ONLY – DANGER: DO NOT USE AT CAMPGROUNDS” on the plug. This prevents accidental misuse by others, such as family members or fellow RVers.
Verify Your Generator Type
Only use this plug with inverter generators (e.g., Honda EU2200i, Champion 2000W) that have a floating neutral. Check your generator manual for terms like “floating neutral” or test it by measuring voltage between neutral (white) and ground (green) terminals without the bonding plug. If the voltage reads 0V, your generator is already bonded—do not use this plug.
Common Mistakes
Creating a generator bonding plug can be tricky. Many people make mistakes during this process. Let’s explore the most common errors and how to avoid them.
Avoiding Wiring Errors
Incorrect wiring is a frequent mistake. Always follow a wiring diagram. Mismatched wires can cause serious issues. Here are some tips to avoid wiring errors:
- Use the right wire gauge.
- Double-check connections before powering the generator.
- Label wires to prevent confusion.
Maintenance Tips
Maintaining your generator bonding plug is crucial for safety and efficiency. Regular upkeep ensures longevity and optimal performance. Here are some essential maintenance tips to keep your generator bonding plug in top shape.
Regular Inspections
Perform regular inspections on your generator bonding plug. Check for any visible damage. Look for cracks, corrosion, or loose connections. Inspect the plug every six months. Create a schedule to remind yourself.
A visual check helps catch problems early. Use a flashlight for better visibility. Pay attention to any discoloration. Discoloration could mean overheating. Ensure the plug fits snugly into the generator outlet.
Replacing Worn Parts
Replace any worn parts immediately. Old or damaged parts can cause failures. Keep spare parts handy. Replace damaged wires, connectors, or plugs. Ensure the new parts match the original specifications.
Follow these steps to replace worn parts:
- Turn off the generator and unplug it.
- Remove the damaged part carefully.
- Install the new part securely.
- Test the plug to ensure it works.
Keep a record of replacements. Document the date and part replaced. This helps track the maintenance history.
Frequently Asked Questions
What Is A Generator Bonding Plug?
A generator bonding plug connects the generator’s neutral to the ground, ensuring safety during power outages.
Why Do You Need A Bonding Plug?
A bonding plug prevents electrical shock by ensuring proper grounding, enhancing the safety of your generator setup.
How Do You Make A Bonding Plug?
To make a bonding plug, connect a wire between the plug’s neutral and ground prongs securely.
Can I use my inverter generator without a bonding plug?
No—it will trigger a ground fault error on your EMS. Inverter generators lack a factory neutral-ground bond, so the plug is essential for RV safety.
Final Words
Creating a generator bonding plug is essential for safety. Follow the steps carefully to ensure proper grounding. This DIY project can save you money and increase your knowledge. Remember to double-check your work and consult a professional if needed. Stay safe and enjoy your newfound skill in generator maintenance.